Friday, February 24, 2023

How to Retrieve Blocked Messages on WhatsApp in 2023

WhatsApp is a free instant messaging app available for everyone. One can use this app on their Android, iPhone, Windows, or MacOS to exchange texts over the internet.

Even though WhatsApp is the most popular instant messaging app, it still lacks spam-blocking options. You get no options to block spam message senders; neither does it use any filter to prevent spam.

The blocking option is all you get to prevent spam from landing in your inbox. You may also want to block users you don’t want to stay in touch with.

Retrieve Blocked Messages on WhatsApp

While blocking and unblocking users on WhatsApp is easy, what about the messages the user sends after getting blocked? In this article, we will discuss how to retrieve blocked messages on WhatsApp. Let’s get started.

How does the WhatsApp Blocking feature work?

If you have someone in your WhatsApp contact list with whom you don’t want to connect, you can block them. Once you block a contact on WhatsApp, you stop receiving their messages, calls, and status updates.

  • According to WhatsApp, here’s what happens when you block someone on the App:
  • The blocked user won’t see your last seen, online, status updates.
  • The messages, calls, and status updates sent by the blocked contact won’t appear on your phone.
  • Blocking a contact will only remove the contact from your WhatsApp contact list. It will not remove the contact from your phone book.

If you have blocked someone, you may wonder if is it possible to retrieve messages from a contact you’ve blocked?

Can You Retrieve Blocked Messages on WhatsApp?

Once you block a person on WhatsApp, they can still send you messages; but you won’t receive them. You will receive the messages only after you unblock them.

Also, once you block someone on WhatsApp, you won’t see their calls or messages in your inbox anymore.

Now let’s come to the question, ‘Can i retrieve blocked messages on WhatsApp‘? Technically, you can’t retrieve the blocked messages, but a few workarounds give you some chances of seeing the blocked messages.

The methods to retrieve blocked messages may vary, and most of them depend on using third-party apps. Let’s check out the best ways to retrieve blocked messages on WhatsApp.

How to Retrieve Blocked Messages on WhatsApp?

If you actively use WhatsApp, you may already know about the message archive feature. The feature allows you to hide messages from your chat list.

Sometimes, users accidentally archive messages instead of deleting them. You can try checking the archive section if you delete the messages before blocking someone on WhatsApp. Chances are that you’ve accidentally selected the archive option instead of Delete. Here’s what you need to do.

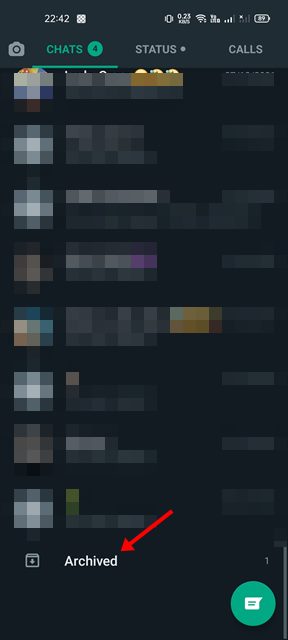
1. Open the WhatsApp app on your phone and scroll to the bottom of your chat feed.

2. Tap on the Archived option at the bottom of the screen.

find the Archived section at the bottom of your chat

3. Now check whether the messages of the blocked contact have been archived. Select the chat and tap on the Unarchive icon.

select the Unarchive option

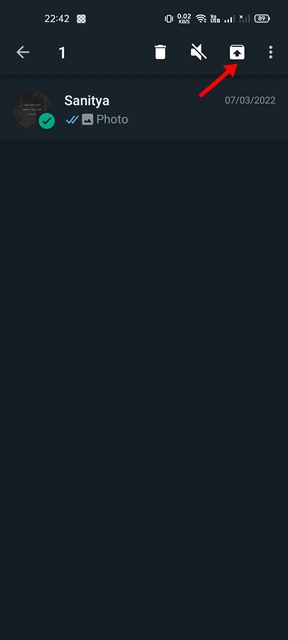
That’s it! This is how you can check the archive section of your WhatsApp to find blocked messages. Once unarchived, you can see the messages received before blocking the person.

Retrieve Blocked WhatsApp Messages via Google Backup

WhatsApp allows you to back up and restore chats on a new Android device. This feature is very useful and can be used to recover blocked WhatsApp messages.

This method will only recover messages you have already received on your account. If the person sends you messages after getting blocked, you won’t see them. Here’s what you need to do.

Retrieve Blocked WhatsApp Messages via Google Backup

1. First of all, uninstall the WhatsApp app from your Android smartphone.

2. Once uninstalled, install it again from the Google Play Store.

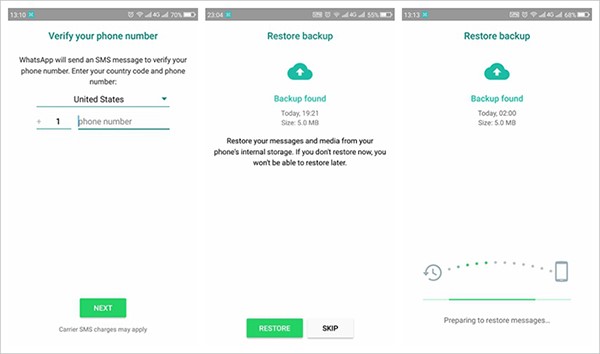
3. Next, open the WhatsApp app and verify your phone number.

4. You will get an option to restore your chats from Google drive. Select the backup file and tap on the Restore button.

5. Now, wait for the restoration process to complete. Once completed, tap on the Next button.

That’s it! Once restored, you will find your chats back. This chat will have the messages of the person you have blocked.

Retrieve Blocked Messages using Third-Party Apps

There are quite a few third-party apps available on the web that claims to retrieve blocked WhatsApp Messages. These groups of apps are known as WhatsApp Mods or modified versions of official WhatsApp.

Most apps are banned and taken down for security and privacy reasons. Also, WhatsApp takes strict action against those who use these mod apps to maximize the features.

There’s always a risk of hacking, virus, and malware linked with using WhatsApp Mods, and avoiding such apps is recommended. Also, there’s a risk of giving away all sensitive details, including the chats, to the app developers.

However, if you can’t stand your urge to view blocked WhatsApp messages, you can use such apps for a limited time. You must ensure that the mod app is clean from viruses and has no security/privacy risks.

So, these are the few best ways to retrieve blocked messages on WhatsApp. Technically, you can only see your conversations with the person before blocking. There’s no way to check messages sent after they are blocked. If this article helps you, make sure to share it with your friends also.

Fix Google Chrome Keeps Crashing on Windows 11 (9 Methods)


Today you have many web browsers for desktops, but none match the simplicity level of Google Chrome. Google Chrome is the most popular web browser, available for Android, iOS, MacOS, Windows, and every other platform.

While Google Chrome is feature-rich and offers many options to control privacy & security options; you can still face some problems while using it.

If you have just installed Windows 11, you may be dealing with Chrome crashing or freezing problems. Google Chrome not working on Windows 11 can be problematic, especially if you are unfamiliar with other web browsers.

Many users have reported that the Chrome browser is freezing on Windows 11. The problem appears after upgrading to Windows 11. Hence, below, we have discussed a few best ways to resolve Chrome keeps crashing Windows 11. Let’s check out.

Chrome Keeps Crashing Windows 11

There can be various reasons that can lead to Chrome keeps crashing Windows 11. If Google Chrome uses too many system resources, your Windows 11 computer will crash.

If the browser is crashing on Windows 11, corrupted cache, firewall blocking, malware, incorrect Chrome configuration, or VPN/Proxy may be the reasons.

Whatever it is, it’s pretty easy to fix Google Chrome crashing on Windows 11. So, if you can’t use Google Chrome on your Windows PC, follow our shared methods.

Fix Chrome Keeps Crashing on Windows 11

If you cannot get Google Chrome running on your Windows 11 device, you can do quite a few things to resolve the problem. Here are the best ways to fix Google Chrome crashing on Windows 11.

1. Restart your Windows 11 Computer

Restart your computer

Before you go on and follow the other methods, make sure to restart your Windows 11 computer. Restarting is recommended before making any conclusion.

When you restart your computer, all apps and processes are released from the memory. If Google Chrome is not working on your Windows 11, you can try restarting your device.

2. Check Background Running Processes

'End Task'

If Google Chrome is freezing Windows 11, you must closely check the background running processes.

You can use the Task Manager on Windows 11 to check all background processes. Check whether the Chrome browser is using the most system resources or any other app.

If you find any app besides Google Chrome, you can disable it from the Task Manager itself.

3. Run Google Chrome as an administrator

If Google Chrome is not opening on Windows 11, try running the web browser as an administrator. For that, follow some of the simple steps we have shared below.

1. Right-click on the Chrome desktop icon and select ‘Run as administrator‘.

Run as administrator

2. The above step will run Google Chrome as an administrator. If you want to always run Chrome as administrator, follow the next step.

3. Right-click on Chrome and select ‘Properties‘.

Properties

4. On Google Chrome Properties, switch to the Compatibility tab.

Compatibility

5. On Settings, check the ‘Run this program as an administrator‘ option.

Run this program as an administrator

6. After making the changes, click on the Apply button and then on OK.

That’s it! This is how you can run Google Chrome as an administrator on Windows 11.

4. Run Chrome Compatibility Troubleshooter

If you are using a version of Chrome that isn’t compatible with the latest Windows 11, you will face problems like Chrome lags on Windows 11, Chrome freezing on startup, etc. You can resolve such issues by running Chrome Compatibility Troubleshooter.

1. Right-click on the Chrome desktop icon and select ‘Properties‘.

Properties

2. On the Google Chrome Properties, switch to the ‘Compatibility‘ tab.

Compatibility

3. Next, click on the ‘Run compatibility troubleshooter‘ button.

That’s it! This will run the Google Chrome compatibility troubleshooter and should fix the problem.

5. Run Chrome without extensions

If you cannot open Google Chrome on Windows 11, try running the web browser without extensions. For that, you need to execute a RUN command. Here’s what you need to do.

1. Click on the Windows 11 search and type ‘RUN‘. Next, open the RUN dialog box from the list.

2. Next, type in the given command on the RUN dialog box and press Enter.

chrome.exe --disable-extensions

type in the given command

That’s it! The above run command will run Google Chrome without any extension. So, if any extension is the culprit behind Chrome not opening on Windows 11, it will be fixed.

6. Disable VPN/Proxy Services

Even though VPN and Proxy services don’t have any direct link with the functionality of Google Chrome, if Chrome is failing to load websites, you can also try disabling the VPN/Proxy services.

VPN and Proxy services often affect internet speed, and specific VPNs can even block websites. If you face problems like websites not opening on Google Chrome, you can temporarily try disabling the VPN/Proxy services.

7. Reset Chrome Settings

If Google Chrome is still crashing on Windows 11, there may be something wrong with the Chrome Settings. You can reset your Chrome settings to fix Chrome’s high CPU usage on Windows 11. Here’s how to reset Chrome in Windows 11.

1. Open the Google Chrome browser on your Windows 11 computer.

2. Type in chrome://settings/reset/ and hit the Enter button on the URL bar.

chrome://settings/reset/

3. On the Reset and clean up section, click on the Restore settings to their original defaults.

Restore settings to their original defaults

4. Next, on the Reset settings prompt, click on the Reset settings button.

Reset settings

That’s it! This will reset chrome settings, chrome shortcuts, disable extensions, delete cookies and other temporary site data.

8. Reinstall the Google Chrome browser

If the reset method didn’t help, or if you cannot reset Chrome, you can try reinstalling the web browser.

Reinstallation will rule out incompatibility and possible data corruption during the installation or due to incorrect settings. To reinstall Chrome, open Chrome Panel, right-click on Chrome, and select ‘Uninstall‘.

Once uninstalled, download the latest version of Google Chrome from the official website. This should fix Chrome crashing on Windows 11 problem.

9. Update Windows 11

Check for updates

Since Chrome crashes on your computer only after upgrading to Windows 11, you can also try updating to the Windows 11 version.

Windows 11 is still being tested, and it’s possible to have app incompatibility issues. Maybe a bug in the Windows 11 you’re using prevents Chrome from functioning properly.

Since you can’t do much to improve the app compatibility in Windows 11, you can try updating the operating system. Maybe Microsoft had already fixed the problem on the latest builds of Windows.

To update Windows 11, head to Settings > Windows Updates > Check for updates. This will automatically check for all available updates and will download & install them automatically.

These are some working methods to fix Google Chrome crashing on Windows 11. If you need more help fixing the Chrome problem, let us know in the comments. Also, if the article helped you, make sure to share it with your friends.